Introduction
When two fighters close the distance and neither can strike freely or complete a takedown immediately, the fight often turns into a battle for grips, head position, underhooks, and balance.
That’s the clinch.
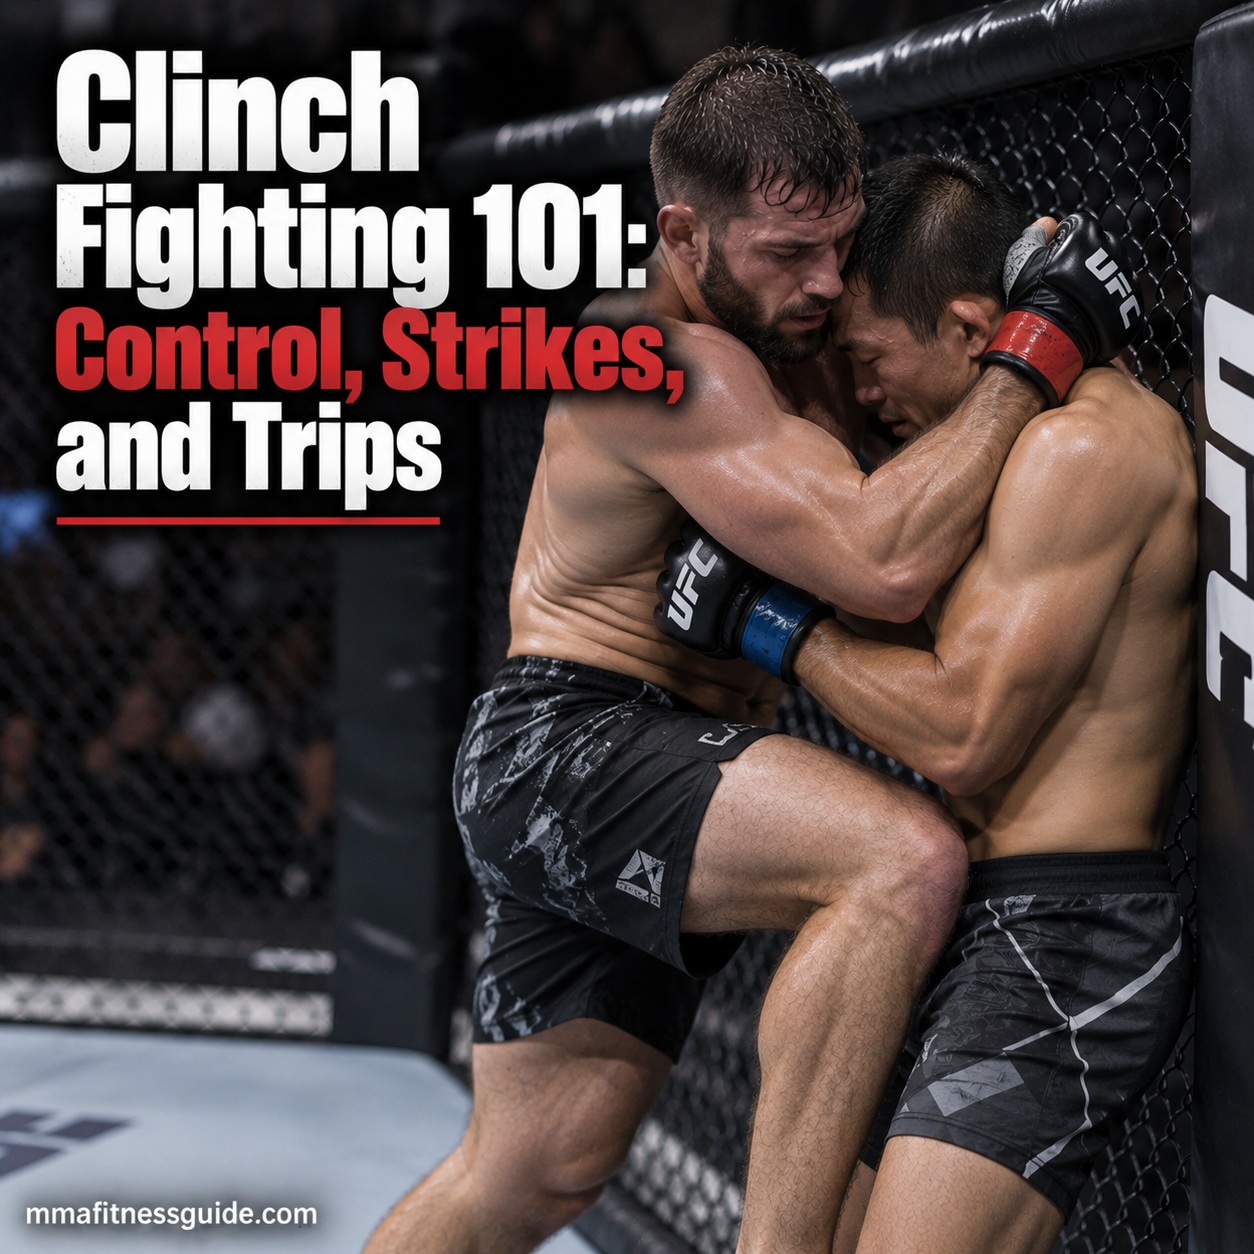
From this range, a fighter can pin an opponent against the cage, land short knees and punches, attack a body lock, set up a trip, or create enough space to return to striking range.
Good clinch work isn’t simply about being stronger. Position, leverage, foot placement, timing, and the ability to transition between striking and grappling determine what you can accomplish at close range.
What Is the Clinch in MMA?
The clinch is a standing position where fighters are close enough to establish grips or upper-body control.
Unlike striking at distance, the fighters are physically connected. That changes how they move and attack.
Common clinch objectives include:
- Controlling the opponent’s posture
- Establishing underhooks or other useful grips
- Pinning an opponent against the cage
- Creating openings for knees and short punches
- Setting up trips and takedowns
- Escaping back to striking distance
MMA clinch fighting draws heavily from several combat sports.
Muay Thai contributes collar ties, knees, off-balancing, and close-range striking. Wrestling provides underhooks, body locks, pressure, and takedown setups. Judo contributes throws, trips, and foot sweeps.
MMA combines elements from all of them while adding the cage and the threat of strikes.
Understanding Clinch Control
Control begins before you attempt a knee, throw, or takedown.
Your position should make it easier for you to attack while limiting what your opponent can do in return.
Head Position
Head position can act as another point of control.
Placing your forehead, temple, or side of the head strategically against your opponent can help influence their posture and movement.
Good head position can make it easier to:
- Apply pressure
- Turn an opponent
- Maintain an underhook
- Defend takedown attempts
- Create angles
The exact position changes depending on the clinch and what you’re trying to accomplish.
Rather than thinking simply about keeping your head “lower,” focus on placing it where it contributes to your control without compromising your posture.
Underhooks and Inside Position
An underhook places your arm underneath your opponent’s arm and around their upper body.
It can help you control their torso, turn them, defend certain takedowns, or begin your own offensive sequence.
Fighters frequently pummel for inside position because controlling the space between the opponent’s arms can create better leverage.
A strong underhook usually works together with:
- Head position
- Hip positioning
- Footwork
- Shoulder pressure
- Grip control
An underhook by itself doesn’t guarantee control. The rest of your body has to support it.
Frames and Creating Space
Sometimes the goal isn’t to stay attached.
Frames use the forearms, hands, shoulders, or other legal points of contact to maintain structure between you and your opponent.
A frame can help you:
- Prevent an opponent from collapsing your posture
- Create room to move
- Set up an escape
- Reposition your arms
- Establish striking distance
Frames are particularly useful when an opponent is pressuring you against the cage.
Instead of trying to push them away using arm strength alone, use skeletal structure, footwork, and positioning to create space.
Balance and Foot Position
Clinch fighting constantly changes your center of gravity.
If your feet become too narrow, crossed, or poorly positioned, an opponent may be able to turn or trip you.
If your stance becomes excessively wide, however, movement can become difficult.
Good clinch footwork involves continuously adjusting your base according to the position.
Pay attention to:
- Where your feet are relative to your opponent’s
- Which leg currently carries your weight
- Whether your hips are vulnerable to a trip
- Whether you can move without crossing your feet
- Whether your stance allows you to attack or defend
These small adjustments often create the opening for a larger technique.
Using Pressure in the Clinch
Pressure doesn’t mean constantly pushing forward.
Effective clinch work involves changing direction.
You might push an opponent backward, pull them forward, rotate them, or briefly release pressure before attacking from another angle.
These changes can force the opponent to repeatedly adjust their balance.
Against the cage, pressure can also restrict movement and make it harder for the opponent to circle away.
The objective is to make your opponent react to your positioning rather than simply trying to overpower them.
Striking From the Clinch
Clinch range creates striking opportunities that don’t exist at longer distances.
Depending on the position and ruleset, MMA fighters may use:
- Knees to legal targets
- Short punches
- Uppercuts
- Hooks
- Legal elbows
- Shoulder strikes
The available strike depends on how you’re controlling the opponent.
Trying to throw without first establishing enough balance and position can expose you to a takedown or counterattack.
Knees From the Clinch
Knees can be particularly useful when you control the opponent’s upper body.
Possible targets depend on the ruleset and position, but body knees are commonly incorporated into MMA clinch work.
The strike should work with your control.
For example, pulling or turning an opponent while delivering a knee can disrupt their posture and make it harder for them to immediately counter.
Don’t sacrifice your entire base just to generate more power.
Maintaining position allows you to continue attacking afterward.
Short Punches and Uppercuts
Punches don’t require full extension to be useful.
Short hooks and uppercuts can fit into small openings when fighters are chest-to-chest or fighting for grips.
They can also encourage defensive reactions.
An opponent who raises an arm to defend a punch may briefly expose an underhook or body-lock opportunity.
That ability to transition between striking and grappling is what makes MMA clinch work different from a purely grappling-based clinch.
Elbows at Close Range
Where permitted by the rules, elbows can be used from short distances where conventional punches have limited room.
Position still comes first.
Throwing an elbow may require temporarily changing your frame or grip, which can create an opening for the opponent.
Clinch striking should therefore be practiced as part of a complete positional sequence rather than as isolated attacks.
Trips and Takedowns From the Clinch
Once an opponent’s posture or balance has been disrupted, takedown opportunities become easier to create.
Common clinch attacks can include:
- Inside trips
- Outside trips
- Foot sweeps
- Body-lock takedowns
- Throws
- Underhook-based takedowns
- Trips against the cage
The setup often matters more than the final movement.
Trying to force a trip against an opponent who has a stable base can turn the exchange into a strength contest.
Instead, look for moments when the opponent steps, pushes, pulls, or shifts weight.
Using Off-Balancing Before the Takedown
Suppose you’re controlling an opponent with a body lock.
Rather than immediately trying to lift or trip them, you might pressure them in one direction first.
When they step to recover their balance, another direction may open.
This process of disrupting balance before attacking is common across wrestling, judo, and other grappling systems.
Good clinch takedowns often feel easier because the opponent’s weight has already been moved where you want it.
Cage Clinching
The cage changes the mechanics of the clinch.
A fighter pressed against it has less room to retreat but can also use the fence for support while defending.
The attacking fighter may work to:
- Maintain head position
- Establish underhooks
- Control the hips
- Land short strikes
- Connect the hands around the body
- Set up trips or takedowns
The defending fighter may try to create frames, regain inside position, turn off the cage, or separate.
Cage work deserves dedicated practice because open-space clinching doesn’t fully reproduce these positions.
Drills for Developing Clinch Skills
Clinch technique improves through controlled partner practice where resistance can gradually increase.
Pummeling
Pummeling teaches fighters to exchange underhooks and regain inside position.
Start slowly.
Concentrate on posture, head position, and footwork rather than turning the drill into an immediate wrestling match.
Wall-Control Drills
Begin with one fighter controlling the other against a padded wall or cage.
The attacking fighter works on maintaining position while the defender practices creating space and escaping.
Switch roles regularly.
Clinch-to-Strike Drills
Start from a predetermined clinch position and practice transitioning into controlled knees or short punches.
The objective is to learn how striking changes your grips and balance.
Off-Balancing Drills
Instead of immediately completing takedowns, practice making your partner step.
Push, pull, and rotate with controlled resistance.
Learning to recognize weight shifts can make later trip practice much more productive.
Clinch-to-Takedown Drills
Begin from a specific position—such as an underhook or body lock—and practice one takedown setup repeatedly.
Once the movement becomes familiar, gradually add resistance and alternative reactions.
Defending the Clinch
Clinch defense starts with improving your position rather than waiting for the opponent to attack.
Depending on the situation, useful defensive actions may include:
- Establishing frames
- Fighting for inside position
- Regaining an underhook
- Improving head position
- Moving your feet
- Turning away from cage pressure
- Breaking grips
- Creating enough space to disengage
Standing still usually gives the controlling fighter more time to improve their position.
Even small adjustments can prevent them from settling into a stronger grip.
Don’t Rely on Strength Alone
Physical strength certainly matters in clinch exchanges, but trying to muscle through every position becomes exhausting.
Good positioning reduces how much effort you need.
Instead of constantly squeezing or pushing at maximum force, learn when to relax, when to apply pressure, and when to change direction.
This becomes increasingly important during longer rounds when unnecessary tension quickly drains the shoulders and arms.
How to Add Clinch Training to MMA Practice
Start with specific positions rather than completely open clinch sparring.
For example:
Round 1: Pummel for underhooks.
Round 2: One fighter starts against the cage and tries to escape.
Round 3: Begin from a body lock and work for controlled trips.
Round 4: Add light clinch striking.
As skill improves, increase the resistance and number of available techniques.
This progression allows fighters to understand the positions before trying to execute everything simultaneously.
Key Takeaways
Clinch fighting connects MMA’s striking and grappling ranges.
Developing it requires more than learning individual knees or takedowns. Fighters have to understand how posture, head position, underhooks, frames, footwork, and pressure interact.
Control the position first. From there, striking opportunities, trips, takedowns, and escapes become easier to recognize.
Regular pummeling, cage work, off-balancing drills, and controlled positional sparring can turn those individual techniques into a usable clinch game.